EVM Quickstart
Flow EVM is an EVM-equivalent blockchain that combines the advantages of Flow, including security, low-cost gas, and native VRF with compatibility with exiting blockchain applications tools, and contracts. If it works on another EVM-equivalent blockchain, it should work on Flow EVM!
This guide is a self-contained quickstart that will walk you through deploying a contract on Flow EVM testnet with Hardhat and testing it with testnet Flowscan.
If you prefer, check out our tutorials for Remix and Foundry for information on how to deploy a contract with those platforms.
Objectives
After completing this guide, you'll be able to:
- Fund a wallet with testnet tokens from the Flow Faucet
- Deploy a contract on Flow EVM Testnet
- Interact with a contract using Flowscan
- Utilize automatically sponsored gas with the Flow Wallet on testnet and mainnet
Prerequisites
Traditional Cryptocurrency Wallet
EVM Accounts created by the Flow wallet have unique properties that allow for powerful features, but they do not have recovery phrases or private keys that can be exported in a way that's compatible with Hardhat. As a result, you'll need to use a traditional EOA and MetaMask, or the wallet of your choice, to deploy your contracts.
Deploy Your Contract
For this exercise, we'll use a Button Clicker Contract that's relatively simple, but includes several OpenZeppelin contracts. This way, we can walk through the process to configure your project to use these common imports.
If you really want to speedrun this tutorial, fork the Button Clicker Contract repo, run npm install, add a .env with your deploy wallet key as DEPLOY_WALLET_1, and deploy with npx hardhat ignition deploy ./ignition/modules/ClickToken.ts --network flowTestnet.
Then skip to the frontend section.
Hardhat Setup
Open a terminal window and navigate either to the folder where you wish to create your project folder, or an empty project folder. Run:
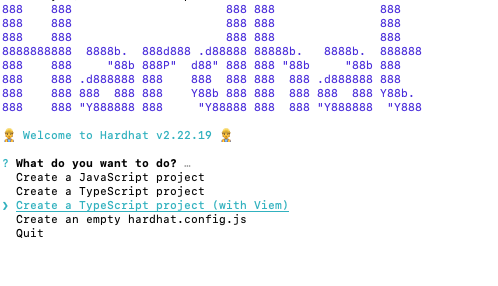
Select Create a TypeScript project (with Viem)
Enter . if you ran the command from an empty folder, or enter a path.
Choose the defaults for the remaining options, then open the project in your editor.
Environment Setup
Add a .env and in it, add an environment variable called DEPLOY_WALLET_1 with your deployment wallet's private key.
The private key functions the same as the recovery phrase for a wallet. Anyone with the key can drain the wallet at any time! Use separate wallets for development and never commit a key to a repo.
Hardhat Config
We'll be using OpenZeppelin Contracts, so install them, then open the project in your editor:
Then install the contracts themselves:
You'll also need dotenv to better protect your wallet key, so go ahead and add that too:
Open hardhat.config. Below the imports, add the require statements for the contracts and dotenv:
The default config is pretty bare. We'll need to add quite a few items. We'll do these one at a time, then provide a complete copy at the end.
First, add a networks property containing the network information for Flow Testnet and Mainnet:
Then, add an entry for etherscan:
In it, add a property for apiKey and add keys for Flow Mainnet and Testnet. Note that the Etherscan API requires this to be here, but at the time of writing, API keys aren't actually needed. Any text can be used:
Next, add customChains and the network information for Flow:
You should end up with:
Contract Setup
Delete Lock.sol and add ClickToken.sol. In it add, the Button Clicker Contract.
Hardhat only installs the most current version of Solidity. ^0.8.27 means that this contract requires 0.8.27 or higher. You generally don't want to include the ^ in your contracts unless you have a specific reason for doing so.
We won't go into the details of the contract for this tutorial. It's a relatively simple ERC-20 implementation that mints one token any time the mintTo function is called. Perfect for a Button Clicker game!
Deployment Setup
Delete Lock.ts from the ignition/modules folder, and add ClickToken.ts. In it, add:
Obtain Testnet Funds
Visit the Flow Faucet and follow the instructions to add testnet funds. Compared to other networks, the Flow Faucet grants a vast amount of tokens - enough gas for millions of transactions.
Deploy the Contract
Deploy the contract with:
You should see something similar to:
Verify the Contract
Next, verify the contract with:
You'll see something similar to:
Testing the Contract
Click the link to open the contract in testnet Flowscan. Click the Connect button and connect your wallet, then navigate to the Contract tab and Read/Write contract.
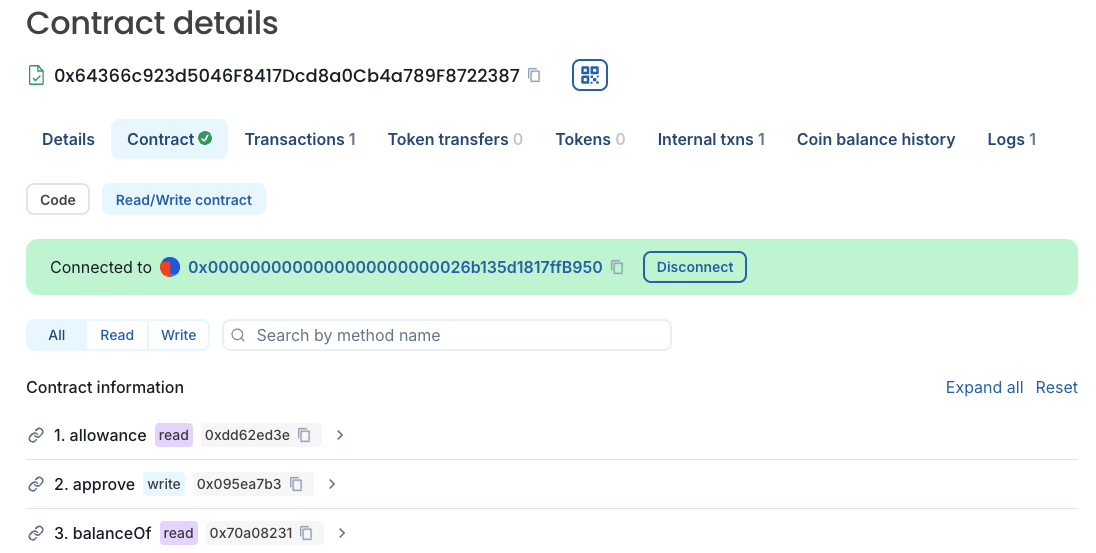
Find the mintTo function and expand the UI to mint yourself a few tokens. You can click the self button to automatically add your address without needing to copy/paste.
Once you've "earned" a few tokens, use balanceOf to see how many tokens you have. You can also use getAllScores to get a list of everyone with the tokens, and how many they have.
Testing with Free Gas
If you don't have it yet, set up the Flow Wallet, connect, and try minting some more tokens. You'll see that the wallet automatically sponsors your gas:

Even better, the Flow Wallet is currently sponsoring transactions on mainnet too!
Conclusion
In this tutorial, you learned how to:
- Fund a wallet with testnet tokens from the Flow Faucet
- Deploy a contract on Flow EVM Testnet using Hardhat
- Interact with a contract using Flowscan
- Utilize automatically sponsored gas with the Flow Wallet on testnet and mainnet
You've now mastered the basics of deploying and interacting with EVM contracts on Flow. But this is just the beginning! Flow EVM's true power lies in its ability to combine the best of both worlds: EVM compatibility with Flow's native features.
In our Cross-VM Apps tutorial series, you'll learn how to supercharge your EVM applications by integrating them with Flow Cadence. You'll discover how to:
- Build hybrid applications that seamlessly connect to both Flow EVM and Flow Cadence
- Use Cadence's powerful features to enhance your EVM contracts
- Enable multi-call contract writes with a single signature
- Take advantage of Flow's native features like VRF and sponsored transactions
Ready to unlock the full potential of Flow EVM? Start with our Batched Transactions tutorial to learn how to build your first cross-VM application.